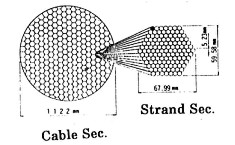
MODERN SURVEY OF LARGE BRIDGE AND TUNNEL PROJECT FOR THEIR CONSTRUCTION CONTROLProf. Taichi OSHIMA, JapanKey words: modern surveying technology, strait cross bridge, integrated marine survey system, ultrasonic wave, laser oscillator, trilateration net, VLBI & GPS, Radio Isotope Sensor. AbstractJapan consists of four islands and many smaller islands. There are several projects connecting these islands, some are completed and some are under construction. This paper introduces two topics, one is concerning the Akashi Brides project and the other is Tokyo Bay Cross Highway. The latter, Tokyo Bay Highway has been completed in Dec. 18, 1997 and the former, the Akashi Bridge completed in April 5, 1998. These have been dubbed the last country's giant public works of the last century. These projects have both extensively used the modern surveying techniques for their construction. This paper outlines the surveying methodology that has contributed to the completion of these huge projects. 1. INTRODUCTIONJapan is situated on the East end of Asia and facing towards The Pacific Ocean and it extends about 3,000 km length. Japan has three to four thousand islands. There are four big islands, Honsyu (main island) which contain big cities like Tokyo and Osaka, Hokkaido, Shikoku and Kyushu where are the most attractive districts in politics, economics and industrial fields. These four islands are connected by bridges and tunnels which are national projects. They are The Seikann Tunnel (sea-bed tunnel of 23km between Hokkaido and the main island), Kanmon Bridge (712m between Kyushu and the main island) and they are already completed. Akashi Strait Cross Bridge had been under construction between Honshu and Shikoku since 1986 and completed in 1998. It is for auto-use only, with six lanes of pavement. This is one of three routes connecting The Main island and Shikoku. They lie in The Inland Sea with in abundant of beautiful natural scenery, one part of the Japanese National Marine Park. The other main topic will describe the 15.1 kilometres Tokyo Bay Cross Highway (we call it Aqua line), that consists of an approximately 10.1km long shield tunnel portion from Kawasaki and a bridge portion about 5km from Kisarazu with a man made island linking the bridge and tunnel portion to the central tunnel. These two big projects mentioned above, are extensively managed by the modern surveying technology in its process of construction. This report describes on how surveying technique was used and how this contributed to the actual field construction project. 2. AKASHI STRAIT CROSS BRIDGEThere are three routes connecting The Main island and Shikoku as I already mentioned above. The Akashi-Naruto route is one of them and completed in April of 1998. The Akashi Strait Cross Bridge is on the Akashi-Naruto route and is near to the main land and the longest suspension bridge in the world. The bridge's total length is 3,910 meters and consist of three spans with two hinge stiffening trusses. The construction charge is 4,013,235,000 $ and 836,029,400$ per 1km in 4,8km length including the bridge and the connecting part to the national highway. It is more expensive than the other bridges connecting between The Main island and Shikoku. The allowable wind velocity for designing this bridge presumed to endure for the one occurring once during 150 years. The truss with stiffener girder type is maintained to keep safely at the time of 80m/sec heavy storm. The two cables with 1.1 meter diameter which consists of 37,000 piano metal lines, each line has 5 mm diameter, were used for supporting the stiffener girder truss load. The height of the main tower is about 300 meters above the mean sea level of Tokyo Bay. It exceeds the Tokyo Tower height of 333 meters by adding the foundation height. Fig. 1 shows the cross section of the bridge.
Fig. 1. Akashi Strait Cross Bridge 2.1 Surveying of Akashi Strait Cross BridgeSurveying of Akashi Strait Cross Bridge is divided into four categories, they are fundamental control surveying, surveying for setting the steel caisson foundation, control survey for main tower and cable of suspension bridge. 2.2 Fundamental Control SurveyingThis is the control survey to determine the coordinates for field work of bridging and its related at both beach sides. This is the first and second order trilateration method using electromagnetic distance meter (EDM) and theodolite. Ten reading works in one set are continued three times and the allowable deviation of reading distance in one set is within 20mm in consideration of all meteorological data. The difference between actual measured distance and checking survey is as follows: Table 1. Distance Check (Spherical)
Fundamental control survey was performed using the Range-master-III type, YHP 3808A Wild T3 and T2. After 1963, K+E Auto-ranger-JX and Sokkia Total Station SET 2EX were used instead of Range-master. The result of over-sea levelling using Wild N3 and T3 is as follows:
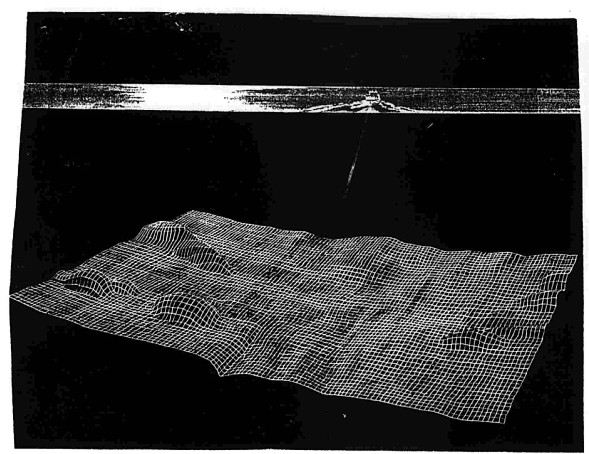
At the both beaches the first order levelling was performed and the error was -0.6mm and -0.7mm compared to the national levelling points. 2.3 Surveying of Steel Caisson FoundationThe Steel Caisson was set up at the predetermined position as the both pier foundation of 2P and 3P of the main tower. Before the setting the steel foundation, large-scale dredger was used for excavating works in accuracy of flatness within+20cm at the sea bottom of 60 meters deep. There at the sea-bottom, the integrated marine survey system was used to check the flatness of excavated bottom. This system measures various marine data such as marine current velocity, direction, temperature besides the depth of sea bottom. Such data are acquired in real time by using ultrasonic wave with topographic resolution +5cm. All types of marine information are recorded on one magnetic tape and on time computed. Unprecedented accuracy is achieved with frequency of 500 kHz and a resolving power of 5cm. Water depth is measured at 120 points in one second by scanning every 1/15,000 second. The figure shows the on-line measuring system by ultrasonic wave which are managed automatically by multi-fan beam modulator on the Grab Ship. The dredger can be used for excavating depending upon the result of sea-bed measurement by ultrasonic wave.
Fig. 2 High Performance Three-Dimensional Sea bed
measuring System developed by Taisei Construction Co. Ltd. Dr. Kanzaki. 2.4 Control Survey of Main Tower and CableThe control survey of the main tower has been done in the factory and checked in fabricating process each 30 step and used three dimensional comparator machine. The several points are checked as each scaffolding step whether the position accuracy is kept within 1/10,000 and finally at the top of the tower in the filed, accuracy of coordinates was controlled within 28.3mm. Also vertically was surveyed by EDM system. This operation was performed during midnight, sometimes continued up to the early morning and finally placed within 1/5,000 of the tower lenght at the top of tower. In fact the verticality error was +5.26mm in south direction and 0.06mm in east direction and 1.08mm as mean value in all direction and gained high accuracy result. The control survey of cable was performed using laser oscillators when it hanged over the bridge. The figure shows the field works, A is laser oscillators and B is receiver. At the center of cable, the sag is adjusted so as to keep the predetermined value in consideration of temperature affection.
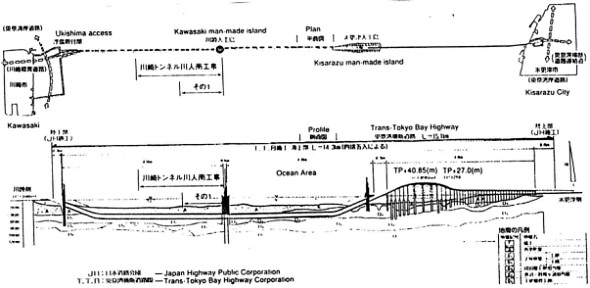
Fig. 3 Control Survey of Cable 3. TOKYO BAY CROSS HIGHWAY (TOKYO BAY AQUA LINE)The Trans-Tokyo Bay Highway completed on Dec. 18, 1997, after eight years four months. The project to build the 15.1 kilometer Tokyo Bay Aqua Line - a toll road that includes the tunnel and links Kawasaki and Kisarazu in Chiba Prefecture - cost 1.44 trillion yen (10.6 billion $). The road consists of approximately a 10 km long shield tunnel portion from Kawasaki, a bridge portion is about 5 km long from Kisarazu with a man-made island linking the bridge and the tunnel portions to the central tunnel. This construction project is of a scale unequaled anywhere in the world requiring the introduction of the latest technology, from the design stage right through to the actual construction work. Lower figures show the plan and profile of Trans-Tokyo Bay Highway.
Fig. 4 Tokyo Bay Cross Highway (Site Length 15.1km) 3.1 Control Survey of construction pointsThe control survey is divided into 3 categories, (1) control survey of deciding the main points along Tokyo Bay and for construction of shield tunnels and bridge (2) surveying in the tunnel (3) fabricated accuracy of segment. 3.2 Control Survey of deciding the main points along Tokyo BayAs several main points of covering along Tokyo Bay are needed, the free net analysis has been performed by connecting the national triangulation points, six points trilateration net. The Range-master III and III-S of K&E and Geodimeter 8 of AGA and Leica Wild D120 were used. Control points for construction of shield tunnel and bridge were surveyed. Using the upper main points along Tokyo Bay. This filed works had been performed in 1989. In 1995 these control points are resurveyed by GPS and confirmed its exactness and gained the accuracy +1.3mm for the 4 outer net control points. The mean distance between these points is 18.5km. Therefore, fixing 4 points coordinates, the other all control points for construction of shield tunnel and bridge were checked and gained the accuracy of +6.1mm by GPS and confirmed shifting about 20mm forward east-northern direction for 7 points out of 9 point. And also combined VLBI points of government control point, did the accuracy comparison and confirmed the mean value of adjustment to be 3.1mm for the mean distance with VLBI point. The height of control points along Tokyo Bay and for construction of shield tunnel also measured by EDM system in 1989 and GPS in 1995. Finally GPS values were used for controlling actual tunnel excavation works about 60 per cent because appeared small height error of GPS. 3.3 Control Survey in TunnelControl survey in tunnel was executed using the outer control points for construction of shield tunnel. The outer control points and inside control points in tunnel are connected by following two ways. The one is piano wire line points dropped into tunnel. The two points dropped in tunnel are extended by means of traversing survey with total station system. Concerning to the deviation of measuring values within tunnel, at the sites of 1,010m and 1,190m from entrance of tunnel, traversing points set on the upper half of tunnel section and lower part were compared to the coordinates and confirmed within +30mm and direction errors by Gyroscope were also checked within 5 second. At the joint point of excavating tunnel from both sides, the deviation error between Kawasaki man-made island to Ukishima (refer to Fig.4) was 151.4mm traversing points 26, mean length between points 81m, standard deviation of measuring angle +3.88" and from Ukishima to Kawasaki man-made island was 62.7mm, traversing points 13, mean length between points 258m and standard deviation of measuring angle +1.66". 3.4 Assemblying accuracy of SegmentTo join the segment within the tunnel, excavating machines of both sides stops separating from each side 50 meter. The head of boring machine RI sensor (Radio Isotope) is attached to detect the positions in the tunnel section. The RI sensor can measure within +5mm in plane, therefore during excavation in 50 meter, segment of both side section can coincide within error of 1cm. 4. CONCLUSIONHere the typical Japanese Civil Engineering Projects are introduced and how the modern survey technique has taken advantage of its process of construction. The author hopes to contribute these technology in more systematic, automatic and integrated way in conjunction to other high technology in all engineering fields in future. He also welcomes any comments and suggestions on this paper and its related problems. ACKNOWLEDGEMENTThe author wishes to express his sincere appreciation to the many individuals who have contributed to this paper. Specifically thanks are due to Mr. Yasutaka Izumi, Manager, Construction Management Section, Trans-Tokyo Bay Highway Corp., Mr. Ryuji Matsumoto, Head of Joint Venture Office (JVO), Kawasaki Tunnel, Mr. Takayoshi Nakamura, Head of JVO, Central man-made Island, Mr. Makoto Kitagawa, Head of Tarumi Construction Office, Honshu-Shikoku Bridge Authority who supplied valuable materials, papers and numerous suggestions. The author also should like to extend his thanks to Mr Takeshi Yamane, the former President of Honshu-Sikoku Bridge Authority for his good advice. And also express the thanks to The Taisei Construction Co. Ltd., Dept. of Technical development, Asia Aerial Survey Co. Ltd., Kokusai Aerial Survey Co. Ltd., Kansai Technical Center and Hasshu Co. Ltd. for their contribution presented the valuable data and advice. Mr. Stephen Longfey has contributed for proofreading of this paper. BIOGRAPHICAL NOTETaichi Oshima got Dr. Eng. Degree from University of Tokyo
and he had been engaging in research and teaching in University of
Tokyo, Institute of Industrial Science for 26 years and Hosei
University for 20 years. Besides that academic career, he had given
lectures in several national and private universities. He has also
involved in International Meeting and Symposium as a speaker and
session chairman. CONTACTTaichi Oshima, Emeritus Professor, Hosei University 20 April 2001 This page is maintained by the FIG Office. Last revised on 15-03-16. |


